394
TECHNICAL SECTION
ENGINE
HEADNUTS – Be sure to use our original style headnuts pages 20 and 181. These have a built in "washer head"
that puts correct pressure against the head. DO NOT use regular nuts with flat washers unless you use Grade 8, otherwise you can have problems.
PUSH TUBE O-RINGS
If you are just replacing them only do 2 at a time. This way you can torque them back down without the head losing its torque and the gaskets are less
apt to leak. Do not loosen the upper head nuts.
1. Remove the old o-rings and clean grooves. Check tube for straightness.
2. Install end of tube back through the head and put on the o-rings on both ends.
3. Put a light coating of regular engine oil on o-rings and start tube as far in as you can by hand.
4. To seat the tube and seal the o-ring, take a socket that just fits inside the end of the tube and give it a couple taps.
5. DO NOT overlook the small o-rings that go on the rocker studs!
6. See "Adjust those Lifters Running" below.
Push Rod Tube End? – The smaller end goes into the block. Put it thru the hole in the head before installing o-ring.
SILICONE on O-RINGS? NO! – We still suggest only a coating of light oil on our Viton o-rings for installation.
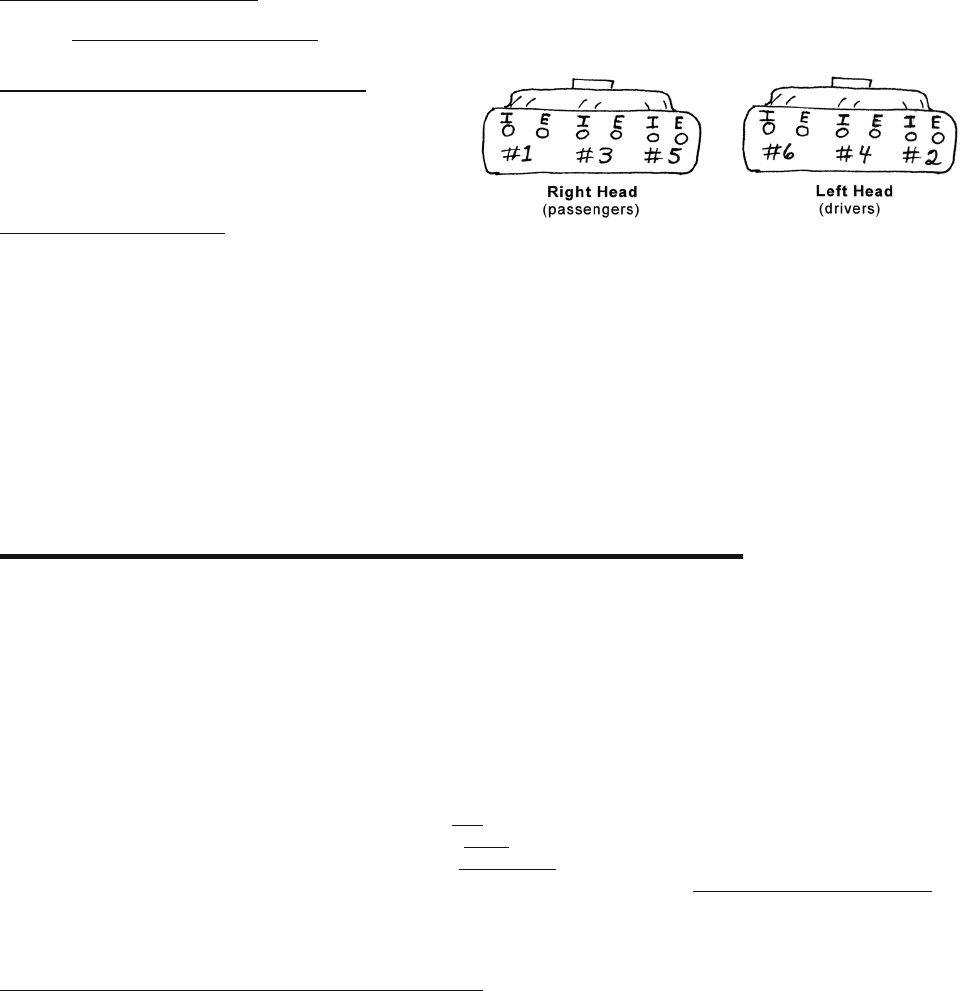
Which Valve is Which?
These diagrams are with you facing the valve area of the head.
I = intake E = exhaust
The # = the cylinder number.
These are important for pre-setting the valve adjustment.
PRE-ADJUSTING LIFTERS ("ball park")
Corvair lifters must be adjusted with the engine running but, you have to pre-adjust the lifters enough to get it running! Most important is to insure that
you really have the engine set to top dead center for the #1 cylinder. It is easy enough to be off 180 degrees. We suggest you double check yourself and
(at least one of the times have the spark plug out of the #1 cylinder to be sure that air is being pushed out) (compression). Just before you get to top
dead center, turn crankshaft counter clockwise to set engine distributor firing #1 cylinder and crankshaft pulley notch at O on timing pad. Lash valves #1
lntake, #1 Exhaust, #3 Intake and #5 Exhaust on the right bank and #4 Exhaust and #6 Intake on the left bank.
Valves are to be lashed in the following manner: Turn down rocker arm adjusting nut using a 5/8" deep socket and ratchet wrench, until you can just
no longer move the pushrod in and out with your fingers. Now go 1/2 turn more. Turn crankshaft counter clockwise and set engine distributor firing on #2
cylinder and crankshaft pulley notch at 0 on timing pad. Lash valves #3 Exhaust and #5 Intake on the right bank and #2 Intake, #2 Exhaust, #4 Intake
and #6 Exhaust on the left bank.
ANOTHER PRELASH METHOD – suggested by a customer – I haven't tried this yet. When you are at the correct valve to adjust, insert a .003 feeler gauge
between the rocker and the end of the valve stem. Tighten rocker nut until you can just easily remove and insert gauge. Now adjust nut down 1/2 turn.
ADJUST THOSE LIFTERS RUNNING
PLEASE! Always adjust those lifters with the engine warm and running. I suggest our 1/3 valve cover. At least 2 times a week a person has an engine
problem that ends up being due to incorrectly adjusted valves (hardstarting, noisy lifters, burned valves, lack of power, loss of power when car gets very
hot, incorrect vacuum readings, poor compression readings, bent push rods, etc.). You must set valves with the engine running!
1. Jack up car (keep as level as possible).
2. Remove muffler. Set on ground and attach with flexible steel pipe such as we sell (page 334).
3. Remove valve covers and replace with our 1/3 valve cover (to keep hot oil from leaking out).
4. Idle car for 10 minutes.
5. Start with a socket wrench on one rocker nut :
A. Slowly loosen nut until lifter starts to clatter.
B. Allow it to run this way 10-20 seconds to see that it won’t pump up and stop clattering (if it does stop clattering back it out
some more until it clatters again).
C. S L O W L Y – tighten rocker nut until clatter JUST stops. Wait 10-15 seconds, then (D)
D. S L O W L Y – Turn the nut in this many turns: Racing – 0–1/2 turn
Normal Driving – 1/4 to 3/4 turn
I prefer 1/2 to 3/4 as it will seldom clatter when starting engine in the morning. DO NOT GO BY THE SHOP MANUAL!
E. Repeat Steps A thru D on the rest of the rocker nuts.
6. Replace the valve cover.
DIPSTICK TUBE PUSHES Oil OUT ?!?
This is quite a common problem for 1962-69. Usually it is caused by excessive pressure in the crankcase which pushes the oil up the tube. The first thing
to check is if the vent tube that comes from the top engine housing through the top shroud and to the air filter is blocked or restricted. Pull the upper
section out and stick a wire down to be sure it is open. (Condensation and oil vapors over the years can block it). In a few cases nothing can be found to
be wrong. In that case you can remove the oil pan and cut off the excess of tube that sticks through the block.
Helpful procedures for installing these o-rings.
The heads do not get removed.


 Prev
Prev 
